Learn how to make Homemade Nixtamal Tortillas with our step-by-step guide. Discover the traditional method for creating delicious tortillas from scratch.
You’ve likely savored the rich flavor of corn tortillas in your favorite dishes, but have you ever wondered about the ancient tradition behind them? The process of making nixtamalized corn tortillas from scratch connects you to a culinary heritage that dates back thousands of years in Mesoamerican culture.
By adopting this traditional method, you’ll not only experience the joy of creating something from scratch but also gain a deeper appreciation for the corn that is at the heart of it all. The nixtamalization process transforms ordinary corn into nutritious, flavorful masa, making your homemade tortillas far superior to store-bought versions.
Key Takeaways
- Discover the historical significance of nixtamalization in Mesoamerican culture.
- Learn how to transform ordinary corn into nutritious, flavorful masa.
- Understand the benefits of making corn tortillas from scratch.
- Explore the traditional method of nixtamalization.
- Experience the superior texture, flavor, and aroma of homemade tortillas.
The Ancient Art of Nixtamalization
The art of nixtamalization has been a staple in Mesoamerican cultures for centuries, transforming corn into a nutritional powerhouse. This ancient process involves treating corn with an alkaline solution to enhance its nutritional value and make it more palatable.
What is Nixtamal?
Nixtamal is corn that has been treated with an alkaline solution, typically calcium hydroxide, to remove the hulls and make the corn more easily grindable into masa. This process not only changes the physical properties of the corn but also significantly enhances its nutritional profile. The caustic alkaline solution partially degrades the plant’s cell walls, making the corn’s nutrients more bioavailable.
The treatment of corn with calcium hydroxide results in nixtamalized corn, which is more nutritious and safer to consume than untreated corn. The alkaline solution increases the calcium content of the corn and helps maintain its fiber content.
The Historical Significance of Nixtamalization
Nixtamalization has been a crucial part of Mesoamerican cultures for thousands of years, playing a central role in the diet and traditions of these communities. The process was first developed by the ancient Mesoamericans, who discovered that treating corn with an alkaline solution made it more nutritious and easier to grind.
Health Benefits of Nixtamalized Corn
The health benefits of nixtamalized corn are numerous. Some of the key advantages include:
- Increased nutritional value due to the bioavailability of niacin, preventing diseases like pellagra.
- A significant increase in calcium content, with some studies indicating a 750% boost.
- Improved protein quality and availability, making it a more complete nutritional source.
- Reduction of mycotoxins that can develop in stored corn, making the final product safer to consume.
| Nutritional Aspect | Untreated Corn | Nixtamalized Corn |
|---|---|---|
| Niacin Bioavailability | Limited | High |
| Calcium Content | Low | Significantly Increased |
| Protein Quality | Lower | Improved |
| Mycotoxin Levels | Potential for High Levels | Reduced |
By adopting the ancient art of nixtamalization, you can enhance the nutritional value of your corn and connect with a rich cultural heritage.
Ingredients and Equipment for Homemade Nixtamal Tortillas
The journey to delicious homemade nixtamal tortillas starts with gathering the right ingredients and tools. To make this traditional Mexican dish, you’ll need to understand the importance of selecting the right corn, having the essential ingredients, and using the appropriate tools and equipment.
Selecting the Right Corn
To make authentic nixtamal tortillas, you need to start with the right type of corn. Look for corn that is specifically labeled as « nixtamal corn » or « tortilla corn. » You can find this type of corn at most Latin American markets or online.

Essential Ingredients
In addition to the right corn, you’ll need a few other essential ingredients, including lime (calcium hydroxide) for the nixtamalization process, water, and salt. Ensure that you use the correct type of lime, as it’s crucial for the traditional flavor and texture.
Tools and Equipment
Traditionally, a metate, a pre-historic lava rock stone and rolling pin, is used to grind the corn. However, modern alternatives include a food processor, grain mill, or masa grinder. You’ll also need a heavy-bottomed pot, preferably stainless steel or enameled cast iron, for the nixtamalization process. A tortilla press makes forming uniform tortillas much easier, and you can line it with plastic sheets cut from a zip-top bag to prevent sticking.
A comal, cast iron skillet, or non-stick pan is required for cooking the tortillas. Keep a clean kitchen towel and bowl handy for keeping the tortillas warm after cooking.

The Nixtamalization Process
Nixtamalization, an ancient Mesoamerican technique, is essential for transforming corn into masa. This process involves several critical steps that not only make the corn more easily grindable but also enhance its nutritional value.
Preparing the Alkaline Solution
To start the nixtamalization process, you need to prepare an alkaline solution, typically using lime (calcium hydroxide). The solution is crucial as it helps break down the corn’s outer layer. The ratio of lime to water can vary, but a common starting point is to mix 1 tablespoon of lime with 4 cups of water. It’s essential to handle lime with care, as it can be caustic.
Cooking the Corn
Once the alkaline solution is prepared, you’ll add dried corn kernels to it and bring the mixture to a boil. After cooking, turn off the heat but leave the corn in the alkaline solution—this is when much of the transformation happens. The corn will start to absorb the calcium, and the pericarp (outer skin) will begin to dissolve.
Soaking and Rinsing
After cooking, transfer the corn and its liquid to a large bowl. Add 4 cups of ice cubes and 4 cups of cold water. Cover and let it sit overnight at room temperature. The next morning, drain the corn in a colander under cold running water, rubbing the kernels between your fingers to remove any remaining pericarp. This rinsing process is crucial for removing excess calcium hydroxide.
| Step | Description | Outcome |
|---|---|---|
| Preparing Alkaline Solution | Mix lime with water | Breaks down corn’s outer layer |
| Cooking the Corn | Cook corn in alkaline solution | Softens corn, starts pericarp dissolution |
| Soaking and Rinsing | Soak cooked corn overnight, then rinse | Removes pericarp, excess calcium hydroxide |
By following these steps, you’ll successfully nixtamalize your corn, making it ready for grinding into masa and eventually forming into delicious homemade nixtamal tortillas.
Making Masa Dough from Nixtamal
Now that you’ve nixtamalized your corn, it’s time to create the masa dough, the foundation of your tortillas. This step is crucial in achieving the right consistency and texture for your homemade tortillas.
Grinding the Nixtamalized Corn
The first step in making masa dough is grinding the nixtamalized corn. You can use a traditional stone grinder or a modern electric grinder. The goal is to achieve a fine texture that will hold together well when forming tortillas. If you’re using an electric grinder, be careful not to overheat the motor.

Achieving the Perfect Masa Consistency
The consistency of your masa dough is key. If the dough feels too wet and is sticking to your hands, add a few extra tablespoons of corn flour. Conversely, if it feels too dry and crackly, add an extra tablespoon or two of hot water. The right consistency is pliable and slightly firm to the touch.
Troubleshooting Common Masa Problems
Sometimes, despite your best efforts, the masa dough may not turn out as expected. Here are some common issues and their solutions:
- If your masa is cracking when pressed, it’s too dry—add more water a tablespoon at a time and knead until the dough becomes pliable.
- For masa that sticks to your hands or the plastic when pressing, it’s too wet—incorporate a small amount of corn flour or dried masa to absorb the excess moisture.
- If your masa has a gritty texture, you may need to soak the corn longer during nixtamalization or use a finer grinding tool.
By following these guidelines, you’ll be able to achieve a perfect masa dough for your homemade nixtamal tortillas.
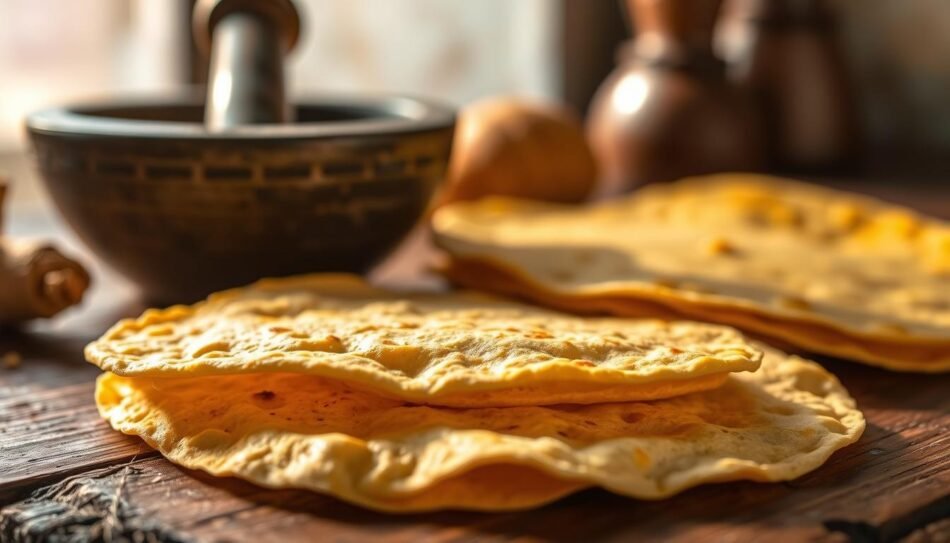
Forming and Cooking Homemade Nixtamal Tortillas
Forming and cooking your nixtamal tortillas is where the magic happens, turning your masa dough into delicious tortillas. This process involves a few key steps that ensure your tortillas turn out perfectly.
Portioning the Dough
To start, you need to portion your masa dough into manageable pieces. Typically, you would divide the dough into small balls, roughly the size of a golf ball. This size is ideal for making standard-sized tortillas.
Using a Tortilla Press
A tortilla press is a handy tool that helps flatten your dough balls into perfect circles. Place a dough ball between two sheets of plastic or parchment paper and press down gently but firmly. This action will flatten the dough into a thin, uniform tortilla.

Cooking Techniques for Perfect Tortillas
Cooking your tortillas requires a hot griddle or skillet. Preheat your cooking surface to a medium-high heat. Cook the tortilla for about 40-60 seconds per side, flipping it once speckled brown spots begin to appear on the bottom. The tortillas will likely bubble up while cooking, especially on the second side, which is a good sign.
| Cooking Stage | Visual Cue | Action |
|---|---|---|
| First Side | Brown spots appearing | Flip the tortilla |
| Second Side | Tortilla puffing up | Remove from heat |
Signs of a Properly Cooked Tortilla
A properly cooked tortilla will have small brown spots on both sides and will be flexible and soft. It should puff up slightly during cooking, creating an air pocket between the surfaces. The edges should not be dry or crumbly, and the tortilla should have a rich corn aroma and slightly toasted flavor.
- A properly cooked tortilla develops small brown spots on both sides.
- The tortilla should puff up slightly, indicating good masa consistency.
- When done, the tortilla should be flexible and soft, not crisp or brittle.
Serving and Storing Your Homemade Tortillas
Now that you’ve made your homemade nixtamal tortillas, let’s explore the best ways to serve and store them. Proper handling will keep your tortillas soft and fresh for a longer period.
Keeping Tortillas Warm and Soft
To keep your tortillas warm and soft, you can wrap them in a clean kitchen towel or cloth right after cooking. This helps retain the heat and moisture. You can also use a tortilla warmer or a cloth-lined basket with a lid to keep them warm for up to 30 minutes.
Traditional Ways to Serve Nixtamal Tortillas
Nixtamal tortillas are incredibly versatile. You can serve them with your favorite fillings, such as meats, cheeses, and vegetables. They’re also great for making traditional dishes like tacos, tostadas, and enchiladas. Experiment with different recipes to find your favorite ways to enjoy your homemade corn tortillas.
Storage and Reheating Tips
To store leftover tortillas, wrap them tightly in plastic wrap or place them in an airtight container to prevent drying out. Store them in the refrigerator for up to 3 days. When you’re ready to use them, reheat the tortillas by wrapping them in a damp paper towel and microwaving for 20-30 seconds or by heating them in a dry skillet over medium heat for about 15-30 seconds per side.
| Storage Method | Duration | Reheating Tip |
|---|---|---|
| Refrigerator | Up to 3 days | Heat in a dry skillet |
| Freezer | Up to 3 months | Thaw overnight, then heat in a skillet |
By following these tips, you can enjoy your homemade tortillas for days to come, and they will still be superior to store-bought options.
Conclusion: Embracing the Tradition of Homemade Nixtamal
Completing the nixtamalization process is not just about making corn tortillas; it’s about embracing a cultural legacy. By making homemade nixtamal tortillas, you connect with thousands of years of culinary tradition and honor the indigenous wisdom that developed this transformative process.
The process requires time and patience, but the superior flavor, texture, and nutritional benefits of homemade corn tortillas make the effort worthwhile for special meals or when you want to experience authentic flavors. As you master the basic nixtamal process, you can explore other traditional uses for masa beyond tortillas, including tamales, sopes, gorditas, and huaraches, expanding your repertoire of authentic corn-based dishes.
Consider making a larger batch of nixtamalized corn than you need for immediate use—the prepared corn can be dried or frozen for future tortilla making, saving time on your next batch. Embracing the artisanal nature of traditional food preparation means appreciating the variability in each batch of homemade tortillas. By doing so, you’ll not only enjoy delicious food but also gain a deeper appreciation for the agricultural traditions and indigenous knowledge that have sustained cultures for millennia.