

Discover the secret to perfect Chocolate Crinkle Cookies. Follow our easy recipe to bake soft, chewy, and irresistibly delicious cookies.
Remember that magical moment when winter’s first chill hits the air? Your kitchen fills with warmth, and the scent of melted cocoa wraps around you like a favorite blanket. For many, this ritual marks the start of holiday traditions—and at its heart lies a treat that bridges generations with every crackled bite.
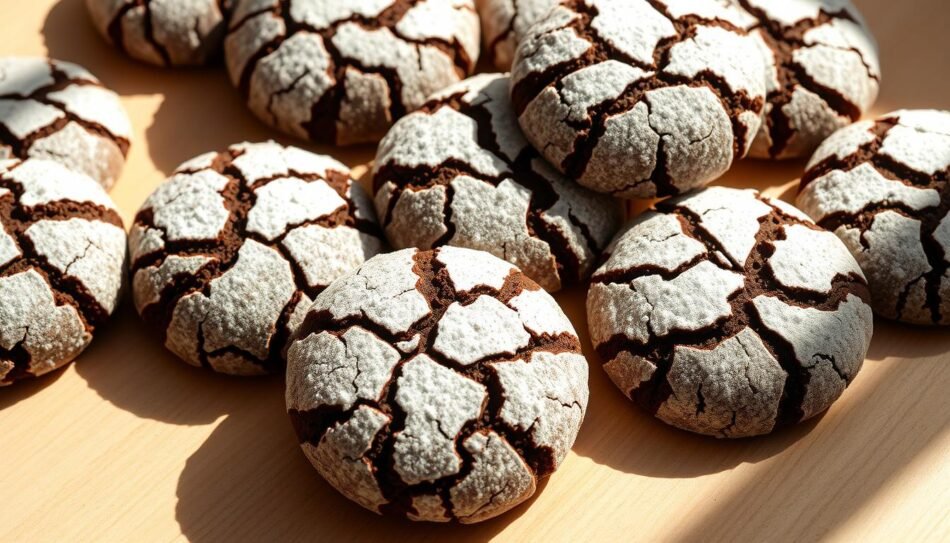
These festive delights combine the dense richness of homemade brownies with a snowy dusting of powdered sugar. Each piece reveals a soft, fudgy center beneath its delicate shell—a textural contrast that’s earned its place on cookie platters nationwide. Whether you’re continuing family customs or starting new ones, this guide unlocks the secrets to creating memories as sweet as the dessert itself.
Chocolate Crinkle Cookies ,You’ll find everything works with ingredients already in your pantry. No fancy tools or rare items—just pure, uncomplicated baking joy. And when relatives beg for the recipe after their third cookie? You’ll be ready.
Key Takeaways
- Discover why these treats became a holiday staple with their brownie-like texture and festive look
- Learn to achieve the perfect crackled finish using simple techniques
- Create 48 bakery-quality pieces with basic kitchen staples
- Freeze extras effortlessly for future gatherings or spontaneous cravings
- Join countless bakers who call this recipe “the ultimate crowd-pleaser”
Introduction: Why These Cookies Are Irresistible
There’s a reason these treats disappear faster than holiday morning wrapping paper. They master the art of contrast—crisp exteriors shattering to reveal velvety centers, while powdered sugar clings like fresh snowfall. This magic happens with everyday ingredients, transforming your kitchen into a pastry workshop without fancy tools.
An Overview of the Recipe’s Appeal
Bakers adore this recipe for its foolproof technique and crowd-pleasing results. The dough behaves like brownie batter but bakes into portable delights. Unlike fussy desserts requiring precise temperatures, these forgive minor mistakes—a blessing for hectic seasons.
| Feature | Crinkle Treats | Sugar Cookies | Snowball Cookies |
|---|---|---|---|
| Texture Contrast | Crisp + Fudgy | Uniform | Crumbly |
| Visual Drama | High (Crackled) | Medium (Iced) | Low (Round) |
| Prep Time | 20 mins active | 45+ mins | 30 mins |
What You’ll Achieve with This Recipe
Expect gasps when you unveil these crackled wonders. They’ll rival bakery offerings yet cost pennies per piece. First-time bakers gain confidence through clear steps, while pros appreciate consistent results. “They’re like edible snow globes—every bite feels festive,” raves a home cook from Ohio.
Your creations will shine at cookie swaps or cozy family nights. Store extras in the freezer, and watch them vanish year-round. This recipe isn’t just about sweets—it’s about creating moments people remember.
Ingredients and Essential Baking Tools
Every memorable baking project begins with two essentials: quality components and reliable gear. This recipe uses pantry staples transformed through precise ratios and smart techniques. Let’s explore what makes these treats both accessible and extraordinary.


Key Ingredients for Rich Flavor
Unsweetened cocoa powder forms the foundation—opt for natural varieties from major grocery stores. Dark cocoa works for intense depth, but standard types deliver classic results. Combine 1 cup with 1¾ cups granulated sugar and ½ cup neutral oil for balanced sweetness and moisture.
Room-temperature eggs bind the mixture, while 2 tsp pure vanilla adds warmth. The dry team—2 cups flour, 2 tsp baking powder, and ¾ tsp salt—creates structure without dryness. A final roll in powdered sugar creates the iconic snowy crust.
Must-Have Kitchen Equipment
Grab two mixing bowls: one for wet ingredients, another for dry. An electric mixer ensures smooth batter, though a whisk works with elbow grease. Use a 1-tablespoon scoop for uniform portions—this prevents uneven baking.
| Tool | Purpose | Alternative |
|---|---|---|
| Parchment paper | Prevents sticking | Silicone mats |
| Wire rack | Cooling | Clean countertop |
| Air-tight container | Storage | Ziplock bags |
Check oil freshness and baking powder activity before starting. For molasses notes, swap half the white sugar with brown. Your tools and ingredients aren’t just supplies—they’re collaborators in creating edible magic.
Step-by-Step Baking Instructions
Transforming simple ingredients into crackled masterpieces requires methodical steps. These instructions guide you through temperature-sensitive stages that guarantee the ideal balance of chew and structure.
Mixing, Chilling, and Preparing the Dough
Grab your large bowl and whisk sugar with cocoa powder and oil until glossy. Add eggs individually, letting each fully incorporate before adding the next. Stir in vanilla for aromatic depth.
Combine flour, baking powder, and salt in a separate container. Gradually fold dry ingredients into the wet mixture using low speed to avoid toughness. The dough will thicken into a brownie-batter consistency.
Cover tightly and refrigerate for 4+ hours. This chill period firms the cookie dough, preventing overspreading during baking. Pro tip: Portion dough balls before chilling for faster shaping later.
Rolling, Coating, and Baking the Cookies
Preheat oven to 350°F while rolling chilled portions into 1-inch spheres. Double-coat each ball in powdered sugar—the first layer melts into cracks, while the second creates snowy peaks.
Space dough mounds 2 inches apart on parchment-lined sheets. Bake 10-12 minutes until edges crisp but centers stay slightly soft. Let cool 5 minutes before transferring—they’ll firm up perfectly as they rest.
Watch for the signature crinkle pattern forming around the 8-minute mark. Rotate pans halfway for even browning if your oven has hot spots. Fresh batches disappear fastest, but these keep well in airtight containers for 4 days.
Baking Tips and Expert Tricks
Unlocking the signature crackled look requires more than following steps—it demands precision with timing and temperature. These insider methods ensure your creations emerge from the oven with that coveted contrast of crisp shells and tender centers.

Achieving the Perfect Crinkle Effect
Start by rolling chilled dough balls in granulated sugar before coating with powdered sugar. This double layer creates a crisp exterior while helping the snowy topping adhere. Work in small batches—coat only what fits on your baking sheet immediately.
If sugar-coated portions sit too long, they absorb moisture and form a hard shell. This prevents proper spreading and crinkle formation during baking. Watch for the powdered sugar to fracture around minute 8, revealing dark cocoa beneath like winter frost patterns.
Adjusting for Oven Variances and Chill Times
Oven thermometers prevent underbaked centers or burnt edges. Confirm your temperature reaches 350°F before loading sheets. At high altitudes, reduce baking powder by ¼ teaspoon and extend chill time to 6 hours.
Don’t panic if treats deflate slightly while cooling—this indicates fudgy interiors. Keep unused dough refrigerated between batches to maintain consistency. Rotate pans halfway through baking if heat zones cause uneven browning.
For electric ovens, place a pizza stone on the lower rack to stabilize temperatures. Gas oven users should bake one sheet at a time for optimal air circulation. These tweaks transform good results into extraordinary ones.
Troubleshooting Common Cookie Challenges
Even seasoned bakers occasionally face kitchen hiccups. When your creations don’t turn out as planned, these solutions help rescue your batch while teaching valuable techniques.
Preventing Flat or Over-Spreading Cookies
Chilled dough is non-negotiable. If portions warm up while shaping, return them to the fridge for 15 minutes. Test your baking powder’s freshness by dropping ½ tsp into hot water—active powder will bubble vigorously.
Oven thermometers prevent underbaking. One Minnesota baker shares: « My cookies stopped spreading when I realized my oven ran 25°F cool. » Always preheat for 20+ minutes before baking.
Ensuring Even Sugar Coating and Texture
Roll dough balls in granulated sugar first—this creates a grippy base for powdered sugar. Work in small batches to prevent warmth from your hands melting the coating. If sugar clumps form, sift powdered sugar before rolling.
| Issue | Culprit | Fix |
|---|---|---|
| No cracks | Old leavening agents | Replace baking powder |
| Uneven spread | Warm dough | Re-chill 30 mins |
| Patchy sugar | Humidity | Use AC/dehumidifier |
For high-altitude adjustments, reduce baking powder by ¼ tsp and increase chill time. Track results in a baking journal—note changes in elevation, humidity, and ingredient brands for future reference.
Creative Variations to Elevate Your Recipe
Baking becomes an adventure when you start experimenting with flavors. This recipe’s adaptable nature lets you craft personalized versions that surprise taste buds while keeping its soul intact.

Flavor Twists and Additions for a Unique Touch
Swap vanilla extract for 1 tsp peppermint oil during winter holidays—it pairs beautifully with cocoa’s richness. For summer gatherings, try orange zest mixed into the sugar coating. Both options add brightness without overpowering the base flavor.
Intensify the main attraction by stirring 1 tsp instant espresso powder into your oil-sugar mixture. “It makes the chocolate taste richer, like a velvet curtain lifting,” notes a Texas baker. The coffee essence vanishes, leaving only depth behind.
| Addition | Flavor Impact | Best For |
|---|---|---|
| Peanut butter chips | Nutty sweetness | Lunchbox treats |
| Cayenne pepper | Spicy kick | Adult gatherings |
| Cinnamon (1/2 tsp) | Warm aroma | Autumn menus |
Fold in ½ cup mini chips for extra texture—their melted pockets contrast beautifully with crackled tops. Reduce oil by 1 tbsp if adding wet ingredients like citrus juice. Always chill dough an extra hour when using mix-ins to prevent spreading.
These tweaks let you make chocolate the star while showcasing your creativity. Whether hosting a cookie swap or surprising neighbors, your unique spin becomes the conversation starter.
Secrets to Perfect Chocolate Crinkle Cookies
What separates good bakers from great ones? It’s not fancy equipment or secret ingredients—it’s understanding how temperature and timing work together. Master these elements, and your treats will consistently deliver that iconic contrast of textures.
Time-Tested Techniques for a Fudgy Center
Patience becomes your greatest tool when handling the dough. Freshly mixed batter behaves like molten lava—too sticky to shape. Refrigerate it for at least four hours (overnight works better). This waiting period lets fats solidify and flavors deepen, creating workable portions that hold their form.
Watch the oven like a hawk during the final minutes. Pull out your baked goods when centers still glisten slightly. “They’ll look underdone to the untrained eye,” admits a pastry chef from Seattle. Let them rest on hot sheets for five minutes—residual heat finishes cooking without drying edges.
Three critical checkpoints ensure success:
- Chill dough until firm enough to leave fingerprints without sticking
- Bake until edges crack but centers remain soft-set
- Cool completely before moving to prevent structural collapse
Rushing any step risks flat shapes or dry textures. Trust the process—even if your creations seem too fragile initially. Proper temperature management creates that elusive combination: crisp sugar shells hugging velvety interiors.
Storage, Freezing, and Serving Guidelines
Keeping your baked creations fresh ensures they taste as good tomorrow as they did fresh from the oven. With simple strategies, you’ll maintain that fudgy texture and crisp sugar coating for days—or even months.
Best Practices for Preserving Freshness
Store cooled treats in airtight containers with parchment between layers. Room-temperature storage works for 4-5 days, while refrigeration extends shelf life to two weeks. For longer storage, freeze dough balls or baked pieces for up to 3 months.
When freezing pre-portioned dough, skip the powdered sugar coating until baking day. Thaw frozen baked goods overnight in the fridge, then refresh in a 300°F oven for 3 minutes. This restores their crackled appearance without drying them out.
Pair your creations with hot cocoa or espresso for contrast. Dust with extra powdered sugar before serving if cracks lose their definition. For gift boxes, include a silica gel packet to absorb moisture during transit.